Configuring Engage+ to work with Journeys
In order to work, Journeys requires three things to work:
- A source of customer data
- A source of customer behavioral triggers (“Events”)
- Campaigns to send
When you configure these, they will always use the same data source, as unique customers are identified using a PKID, which needs to be consistent.
Setting up a Table
Your Journeys account will use a default table, which every journey will default to when you create it. It is possible to override this on an individual journey basis if required - however, if you are using Exits to trigger another journey, we’d recommend that you stick to the default so that all of your journeys run from the same send table.
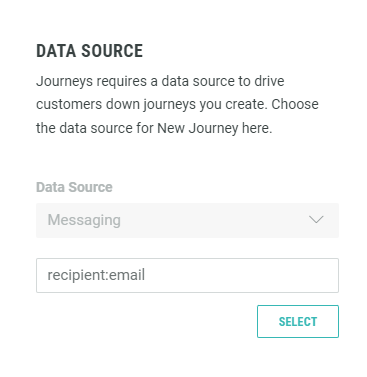
The table you use for your journey can be found under JOURNEY SETTINGS>DATA SOURCE

Selecting the data source is a two step process:
- Select the table (if you already have a table selection, use the BACK button at the bottom of the modal to see a list of all of your tables)
- Select up to three attributes
The attribute selection is useful when you are using Journey Simulation or Journey Logs to define the attributes which are displayed and are searchable. As a default, we’d recommend choosing First Name, Last Name, and Email.
Setting up Campaigns
Setting up campaigns is simple, and if you have already created campaigns which are set up in the same way as below, it is possible to reuse your content in your journey (if not, it is possible to duplicate the campaign and change the settings).

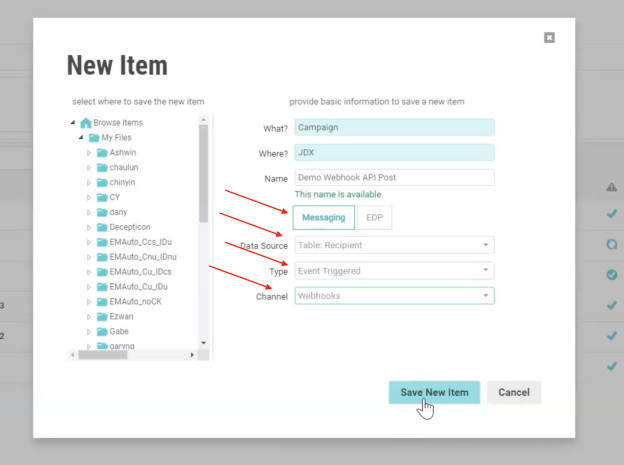
When you create the campaign, you’ll need the following settings:
- Where: The folder location you want to use, which is entirely up to you
- Name: Whatever you want to call the Campaign
- Send type: Is always MESSAGING
- Data Source: Same as your journey
- Type: Always EVENT TRIGGERED
- Channel: Email, SMS, or Push are supported by Journeys
Once your campaign has been created, you’ll need to add a Simple Trigger under the Triggers Section - there are no settings to change here, as once you save your campaign, this will automatically generate an ID which can be used by Journeys.
Setting Up Events
Event Subscription
Event Subscription is the easiest way to use events in Journeys. Journeys comes with a pre-configured set of Event “types”, which provide a basic structure for all of the data that you might need to personalize your journey to the customer.
When you use these events in your journey, they are “empty” - they are just a data structure with no understanding of how a customer will trigger them. For this, you will need to map your customer triggers to an event in Engage+.
You can map multiple triggers to an Event Type, which has the advantage of only ever having to set it up once and re-using it. For example, if you are launching a new online store, and are already using journeys to manage the customer experience with your existing stores, you can map new triggers to the existing Purchase Event to send customers from the new store on the existing journey.
If you ever need to filter out customers - for example, if you want to exclude a customer coming from another channel, you can set up conditions in the Start Step of your journey.
Event Mapping
Event Mapping plays a key role in how events are triggered and categorized. Events are grouped into predefined types, such as a purchase. Engage+ uses Event Maps to trigger events whenever data is added or updated. These maps can assign multiple triggers to a single event type. For example, in scenarios with multiple online stores, each store can have its own trigger for a purchase event. This mapping system ensures that events are accurately tracked and processed based on the specific conditions of each trigger.
Webhooks
Create a Webhook
Webhooks are a way for you to create highly customizable events, based on any trigger within Engage+ - they are more flexible than Event Subscription, but are more complicated to set up. Fortunately, many of the settings are the same every time you set one up.

Webhooks are a channel, just like Email or SMS campaigns, so the basic creation settings are exactly the same as other campaigns.
- Create a campaign
- Use the same settings as any other campaign
- Under Channel, choose Webhooks
Your trigger is what will fire your webhook. There are multiple ways to achieve this, and it is likely that you will already have some triggers set up which you can re use.
Without a trigger, Engage+ is unable to tell Journeys that a customer has done something, as the webhook will not run.
Configuring Filters
Filters are a really useful way to exclude certain customers from going on a journey, and can be added to your webhook.
If you want all customers to go on this journey when they do something, you can leave this set to “All Matching Records”.
Top Tip: If you want to try out your Webhook in your live environment, use a filter which only matches your details in the send table, so that you don’t accidentally send genuine customers on the journey.
You can find more information about filters here
Configuring Event Data
This is where it gets slightly more complex, but the great news is that most of this can be done through copy-and-paste.
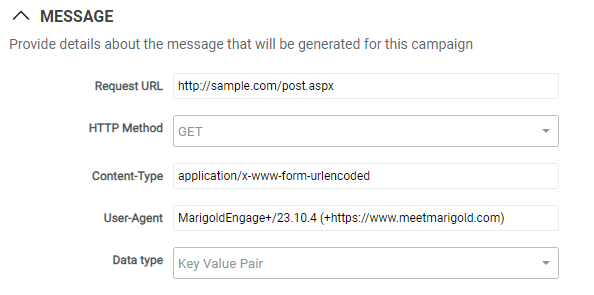
The first step is the MESSAGE section:

- Request URL: This can be found under JOURNEY SETTINGS>JOURNEY ENDPOINT. You’ll need to remove the code at the end of the URL, but it is the same for all of your journeys
- HTTP Method: POST
- Content-Type: Application/JSON
- User-Agent: This is automatically generated by Engage+, so unless you want something specific (e.g. using Postman), don’t change this
- Data Type: Body
Once you have set this up, you’ll scroll down to the body to edit your JSON. You can copy the JSON which appears in the JOURNEY SIMULATION, to make sure that all of the required data appears.
The JSON which is copied to your clipboard from where will highlight the values which need to be updated, and you can use the personalization panel on the right hand side to drag variables to your JSON.
